There's always a moment you want to remove your photos away from its default iPhone destination. This post shows you how to delete multiple or all photos from iPhone without repetitive tapping and dragging.
Reasons to remove photos off iPhone can be various, with freeing up iPhone space being the chief concern. It's no exaggeration to say the valuable photos are grade-A space hog on iPhone. So making a temporary or permanent deletion of your iPhone photos is a good option to regain more iPhone storage. Unlike other posts that just share the steps to delete photos from iPhone with Photos app, some of which you may want to keep on other locations, the post focuses on emptying iPhone photo library but keep your cherished memory safe and intact. Check the links below to direct you to the specific part:
Part 1: How to Delete Photos from iPhone with Photos App
Part 2: Why Photos App Isn't the Best Option to Clear out Images
Part 3: Best Alternative to Bulk Delete iPhone Photos without Restriction

Try MacX MediaTrans - The Fastest App to Backup/Transfer/Delete iPhone Photos
- Remove iPhone photos selectively or in bulk without tedious tapping.
- Transfer photos (JPG/PNG/GIF/BMP/TIFF/HEIC) between iPhone and computer.
- Auto convert HECI to JPG for viewing on older Mac/iPhone or other photo apps.
- Fast transferring speed - 100 4K photos can be synced within 8 seconds only.
Photos app is regarded as the best solution to finish the job. You can follow the steps below.
1. To delete single or multiple photos:
Open Photos on your iPhone > tap Select on the top right of your screen > tap the photos you want to delete from iPhone > click the trash can icon on the bottom right of your screen, after which a prompt "Delete x Photos" appears > tap on the button to confirm deleting them.

2. To delete all photos from iPhone:
Open Photos on your iPhone > tap Albums on the bottom right of your screen > tap Edit on the top right of your screen > tap the red "-" icon on the top left of the album you want to delete > click Delete Album> tap Done to finish deleting entire photo albums. Detailed guide to delete photo albums from iPhone

How to Delete Photos from iPhone but Keep on iCloud
If you just want to reclaim your iPhone storage space by deleting your photos but keep your valuable memories on iCloud safely, please make sure to you DO NOT enable "Download and keep originals" function. You can disable iCloud Photo Library or sign out iCloud account before deleting photos from iPhone.
Related Topics: How to delete iCloud backups, photos not uploading to iCloud
1. The whole photo removal process is completed at the cost of tedious one-by-one tapping and dragging.
2. Deleting the self-created photo albums with the Photos app itself doesn't really mean you've removed its contents. They are still in your camera roll. You can resort to third-party iPhone manager to remove photos from iPhone camera roll.
3. The second solution mentioned above is only feasible to remove large collection of photos in the albums created by yourself or third-party apps such as Snapchat or instagram. You can neither remove default albums (such as Camera Roll, Screenshots, selfies, panoramas, slo-mo, People, Places, video, favorites, recently deleted) nor get rid of the photo albums synced from your computer.
4. Sometimes when you follow the steps above with Photos app but end up with failure to delete your photos. This might be possibly because you turn on "Optimize iPhone Storage" setting, which functions to optimize photos with low-resolution and smaller size on your local phone but keep the original ones in iCloud.
Want an easier and less restrictive way to delete photos from iPhone to save storage space and keep them on your computer? You can use MacX MediaTrans to get rid of all the problems mentioned above. It helps you to transfer your iPhone photos to Mac as backup and bulk delete photos or whatever photo albums from iPhone iPad without any restriction.
Compared with Photos app, it is much better for iOS users to freely delete single, multiple photos or albums, be it from screenshots, panorama, selfie, place or third-party app. You can even transfer photos from iPhone to Mac as a backup without the annoying iCloud issue and then make a deletion of your precious images within a single click. It also gives you full control over your other iOS data, such as videos, music, voice memos, ringtones, ebooks and more. Just follow the steps below to complete the photo deletion from your iPhone.
iTunes Setup: Launch iTunes and click "iTunes"> "Preferences…". Followed by a hit on "Devices" and tick the option "Prevent iPods, iPhones, and iPads from syncing automatically". Ok, done. Let's go back on track.
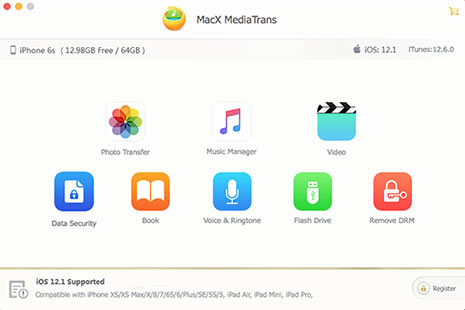
Free download this iPhone manager on Mac and install it. Connect your iPhone to computer with a USB cable. Launch the app and click "Photo Transfer" on the main interface to fire off the photo management feature.
This iPhone photo transfer tool not only supports you to transfer and delete iPhone photos, but also ensures a fast photo transferring speed, by taking advantages of level-3 hardware acceleration technology. It works with the latest iOS 17 and iPhone XR (Max)/XR.

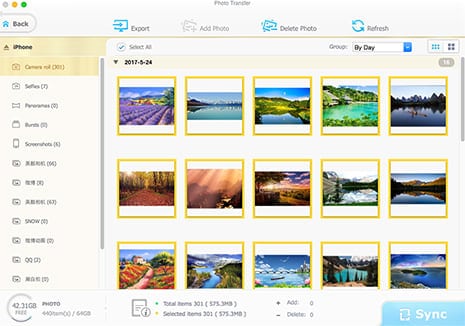
Select the photos you wanna transfer or "Select All" and then press "Export" button to backup iPhone photos locally just a click away.
Note: You're allowed to import photos from iPhone to Mac in album or batch, arrange your panorama, pictures, selfie, screenshots and more based on Day/Month/Year, and also convert HEIC to JPG for wide compatibility.

Open the photo albums > choose the pictures you want to delete or just click "Select All" > hit "Delete Photo" button to delete photos from iPhone 8/X or other older or newer models > press "Sync" button and your unwanted photos will be removed from iPhone.
Warm Prompt: Only when the photo album is empy without any images can it be deleted from your iPhone.

The above data transfer and delete steps are also applicable to music, video, eBooks, ringtones, iTunes U and more on your iPhone iPad iPod. It lets you freely sync files between iOS device and computer no matter the file is unprotected or DRM protected.

- Two-way transfer: Import/export photos, (DRMed) music and videos, voice memos, books.
- Manage media files: Encrypt/add/delete/edit files, make ringtone which iTunes cann't.
- Auto convert/rotate: convert MKV, AVI, or other non-Apple videos/music.
- Fastest transferring speed, easy operation and no data erasing.
Guide you to export photos from iPhone to Mac and vice versa
Follow this tip to put iPhone video to Mac to free up storage
For any questions with MacX MediaTrans, please feel free to contact our support team.
Home | About | Site Map | Privacy Policy | Terms and Conditions | License Agreement | Resource | News | Contact Us
Copyright © 2025 Digiarty Software, Inc (MacXDVD). All rights reserved
Apple, the Apple logo, Mac, iPhone, iPad, iPod and iTunes are trademarks of Apple Inc, registered in the U.S. and other countries.
Digiarty Software is not developed by or affiliated with Apple Inc.