How to Backup WhatsApp Photos on iPhone iPad without iCloud
It's scary when you find your phone falls into a tub of water, gets malfunctioning due to a Trojan invasion, or stumbles during a software update but you haven't made any backup of your important data such as the photos on WhatsApp. Even creepier, the masses of photos gradually eat up your iPhone space. Seemly to backup WhatsApp photos and migrating them to your computer can be a great way to protect your data and free up some iPhone space.
iCloud knows the crux. You can make a backup of WhatsApp photos as long as you set up an automatic backup (Go to iPhone's Settings > iCloud > Backup > turn on iCloud Backup > next you need to go to WhatsApp and open it > Settings > Chat Settings > Chat Backup > tap on Back Up Now or turn on Auto Backup). The WhatsApp photos will be backed up onto iCloud daily, weekly or monthy as per your needs. However, there is a U-turn. iCloud backup is bound to many limits and problems:
1. There is only 5GB free iCloud storage for WhatsApp photos or other media files backup. Roughly 333 4K photos will use up 5GB storage, let along the high-quality videos. This leads to iCloud storage full problem easily.
2. To backup WhatsApp photos with iCloud doesn't necessarily mean a safeguard against any sudden deletion of photos from your iPhone. iCloud backup just ensures a temporary backup of WhatsApp photos or other files. If you delete the photos from iPhone, so does it on iCloud.
3. iCloud just makes a whole backup of WhatsApp photos by day, week and month. You have no choice to make a selective backup of WhatsApp photos.
How to Backup WhatsApp Photos on iPhone Quickly and Reliably
The imperfections of iCloud will somehow discourage you for WhatsApp photos backup. Hold on, there is great iCloud alternative - MacX MediaTrans. It is a reliable and fast photo backup app that is hassle-free to backup photos on Whatsapp from iPhone to your computer (both selectively and wholly) and save them on your hard drive without any worry about storage or sudden deletion. With flawless support of HEIC photos, you can even view heic photos, convert heic to jpg for watching on Android or Windows, and delete photos to release your iPhone space.
Supported OS: macOS High Sierra, Sierra, El Capitan, Yosemite, etc.
Supported iOS: iPhone X, iPhone 8, 7, 6 (Plus), etc.
 FREE DOWNLOAD MacX MediaTrans on your Mac and follow the steps below to migrate and copy WhatsApp photos from iPhone to Mac. You can also go to the Windows version to create a reliable and fast backup of WhatsApp photos.

Step 1: Connect your iPhone to computer with a USB cable. Confirm to Trust This Computer if asked.
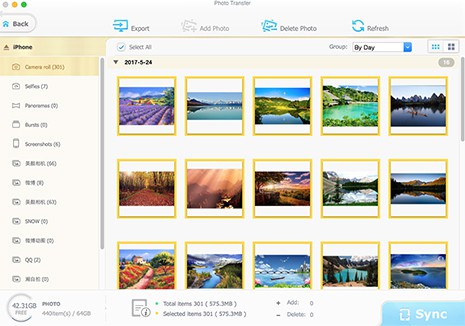
Step 2: Open MacX MediaTrans and click Photo Transfer on the main interface to fire off the photo backup window.
Note: MacX MediaTrans can also back up WhatsApp videos, transfer photos, music, books, ringtones, etc at fast speed.
Step 3: On the left side, there are many iPhone photo albums, covering Camera Roll, WhatsApps, Selfies, Screenshots, etc. You can just select the whole photos from WhatsApp by day, month or year or choose the partial photos at your disposal.
Step 4: Click Export on the top side and the app will begin to transfer WhatsApp photos from iPhone to computer. Once the photos on WhatsApp are backed up on your computer, you can also use the app to delete the photos and make more room for your iPhone.
How to Create a Backup of WhatsApp Photos on Android
Like iCloud, it's exciting Google integrates Google Drive to WhatsApp for Android, allowing you to automatically backup all your chat messages, photos and videos on WhatsApp to the cloud daily, weekly and monthly. You can follow the steps below and take a quick and audto backup of WhatsApp photos to Google Drive as long as you have a Google account activated on your Android 2.3.4 or higher.
Step 1: Open WhatsApp on your Android.
Step 2: Go to Menu > Settings > Chats and Calls > Chat Backup > Back up to Google Drive.
Step 3: Set up the backup frequency as per your needs.
Step 4: Select a Google account where you want to backup your photo history or tap Add account if you have no account.
Step 5: Click Back up over to choose the network. And wait for the backup to finish.
 By Rico Rodriguez to WhatsApp Tips, Backup Photos | Last Updated on Dec 7, 2023


