How to transfer video from iPad to Mac? This article will show you the simplest way to transfer iPad videos to Mac (Macbook Pro/Air, iMac etc.) for further editing, backing-up or sharing with friends.
There is no doubt that Apple's iPad is qualified as desirable devices for videos or movies entertainment due to its HD Retina display and personalized design. Thus a myriad of videos are stored by users in their iPad Pro, iPad mini/air. But transferring video from iPad to Mac is well worth considering since there are situations like running out of iPad storage space, backing-up your memorable videos for another devices storing, or further editing videos.
You of course can sync videos from iPad to Macbook, iMac, Macbook Air/Pro with iTunes. But you should know that if you sync videos from iPad to Mac with iTunes, you will lose the existing media files on our iPad like videos that you've imported from DVDs, downloaded from website or purchased somewhere other than iTunes. Not to mention many iTunes users complain it's too complicated and difficult to use.
Are there any simplified methods to import videos from iPad to Mac? Scrolling further to find the easiest way to sync video from iPad to Mac.
MacX MediaTrans is a not so famous but absolutely effective tool to sync video from iPad to Mac easily and fleetly. It allows you to copy and move videos between iOS devices and Mac, no matter the iPhone iPad recognized video formats or other formatted videos. Still, the unique decryption feature makes it possible to remove the purchased iTunes M4V videos DRMs during the iPad video transferring so that you are able to watch your iPad movies on Mac without any limits.
Unlike iTunes' complicated operations, this program offers straightforward easy-to-use iPad videos to Mac transferring tutorial in several clicks. You can succeed at copying video from iPad to Mac within short period of time thanks to the built-in Hardware Acceleration tech.
Moreover, due to the various angle of holding iPad, and different aspect ratio between iPad and Mac, there is a problem that the videos will not well displayed after importing video from iPad to Mac. But McaX MediaTrans keeps you out of this trouble owing to the video auto-rotate function, which helps you rotate the iPad video in order to display it properly on Mac.
Before you start, free download MacX MediaTrans (El Capitan, macOS Sierra all supported), or download Windows version (Win 10 also supported) and launch it on your Mac. It's 100% clean. Then turn off the iTunes auto sync function following the iTunes setting popup.
Step 1: Connect your iPad to Mac
Connect your iPad Pro/Air/mini to Mac via a USB cable. And your iPad data will be automatically detected to Mac.
Step 2: Select the Target Video Files.
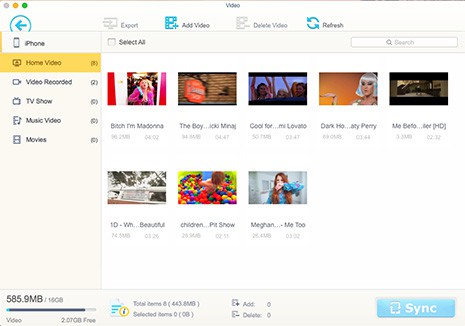
Click "Video Transfer" on the main interface and you will find all your videos are listed by categories. Select the target video files.
Step 3: Start Syncing Videos from iPad to Mac.
Click "Export" button on the top of panel to start importing videos from iPad to Mac. The process will be done in an extremely short period of time.

During the process of syncing iPad videos to Mac, DO NOT pull out the USB cable between your iPad and Mac. Or else some errors like data loss, interruption etc. will happen to you.
Learn iPhone 8 tips tricks, reviews, pros to make best of iPhone 8.
Follow this tip to put iPhone video to Mac to free up storage
Guide you to export photos from iPhone to Mac and vice versa
For any questions with MacX MediaTrans, please feel free to contact our support team.
Home | About | Site Map | Privacy Policy | Terms and Conditions | License Agreement | Resource | News | Contact Us
Copyright © 2025 Digiarty Software, Inc (MacXDVD). All rights reserved
Apple, the Apple logo, Mac, iPhone, iPad, iPod and iTunes are trademarks of Apple Inc, registered in the U.S. and other countries.
Digiarty Software is not developed by or affiliated with Apple Inc.