Are you addicted to recording videos? If the answer is yes, you must have encountered some circumstances that you need to shrink video file size, for example:
What Are the Factors Affecting Video File Size?
How can you shrink video on Mac and Windows for smaller size? Average users may be aware of seeking a video shrinker and know how to twitch some of qualities to reduce a file size like resolution and such dimly. But that's not enough. To reduce video files size smaller but better quality, you should know what matters for video size indeed.
1. Codec
A codec is a software tool used to compress or decompress a video. Different codec uses different compression algorithm to encode video files. And the codecs used to compress the video will determine the ratio of quality to file size. For example, the HEVC improves up to 50% compression efficiency over H.264/AVC, while AV1 is claimed to boost 30% coding efficiency compared with HEVC and VP9, but same high quality. And owing to codecs are wrapped in various fomat containers, we have a test to convert a same video (H.264 codec MP4 of 1.05MB) to different codecs and formats as bellow:
| Codec | H264 (original) | hevc | DivX | MPEG4 | WMV2 |
|---|---|---|---|---|---|
Container |
MP4 |
MP4 |
AVI |
MP4 |
WMV |
Size |
1.05MB |
486KB |
3.01MB |
2.99MB |
2.75MB |
Quality |
Good |
Excellent |
Excellent |
Good |
Good |
2. Resolution
The resolution describes the number of horizontal lines your video has in each frame and it's displayed in width by height. Take 1920x1080 as an example, it means that there are 1080 horizontal lines, each 1920 pixels wide. The smaller the resolution is, the smaller your video size will be. But there are some common display resolutions for digital devices, like 1920x1080, 1280x720, 960x640 etc. You are not recommended to downscale resolution too much of your devices' display screen, or else you'll get poor video quality.
3. Frame Rate (FPS)
The frequency at which separate frames are displayed. It's expressed in frames per second. The higher frame rate your video has, the larger size it will be, but more fluent at the same time. The main standards for video frames go for 23.98, 24, 25, 29.97, 30, 50, 59.94 and 60.
4. Bitrate
Bitrate, aka data rate controls the visual quality of the video and its file size. Higher quality files have a higher bitrate. If your bitrate video compression software gives you the option to choose variable bit rate, select 2-5 Mbps for SD, 5-10 Mbps for 720p, 10-20 Mbps for 1080p, and 30-60 Mbps for 4K videos to get the best visual quality.
5. Duration
It has been a common sense that the video file size grows with the duration. If your video is too long and too large, you can trim the length of video to divide it into pieces. If you're trying to upload video to YouTube, Facebook that have a strict limit for video length, you might as well try this method after you've done other settings.
Is There A Video Shrinker to Compress Video with Size and Quality Trade-off?
After you've checked the influence factors about video file size, what you should do next is to adjust all the factors to reduce video file size. Then a solid video shrinker matters a lot for video compression. Luckily, MacX Video Converter Pro comes to the ideal video processing tool to shrink video size by up to 90% without visually quality loss. Meanwhile, it allows various ways to compress video on Mac and Windows, namely converting video formats, transcoding video codecs, changing resolution, lowering frame rate and bitrate and trimming the video length etc.
How About MacX's Video Shrinking Performances Over Handbrake?
To tease out the superiority of MacX Video Converter Pro, we've tested to shrink a large-sized iPhone recorded 4K MOV video through it and Handbrake with the same settings. Learn how big a minute of iPhone recorded 4K video >>

I'm running on my Mid 2011 27-inch iMac with OS X Yosemite, 2.7 GHz Intel Core i5, 8GB 1333 MHz DDR3, Graphics AMD Radeon HD6770M 512 MB.
Apparently, MacX shrinks video more greatly with a 3.7MB output than 11.2MB with Handbrake. And MacX takes 1 min 19 secs to make this video compression done on Mac, while Handbrake needs 2 minutes and 10 seconds indeed. Both videos look awfully clear, without any visually quality loss. Thus, why not free download the faster and higher ratio video shrinker to reduce your video size.
How to Shrink Video File Size By up to 90%?
Step 1: Import your original video.
Free download the video shrinker for Mac or Windows version on PC, install and launch it. Then click + Video or simply drag and drop to import your video to the program.
Step 2: Select output format.
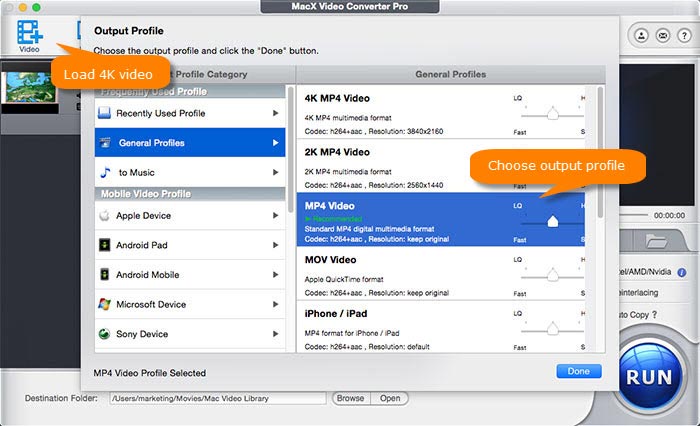
After the video are loaded, you're asked to choose output format from the popped up window, which has a dozen of profiles, including general purpose formats, the latest gadgets from Apple or Android, all common used game consoles, video presets for YouTube, Facebook etc. You're suggested to choose General Profiles > MP4 Video (HEVC) > Done to get smaller size video to the hilt for storage, while if you're going to upload video to the website, scroll down to Web Video Profile, then tap YouTube Video to choose MPEG4 or H.264 codec MP4 as you like.

Step 3: Adjust video parameters setting.
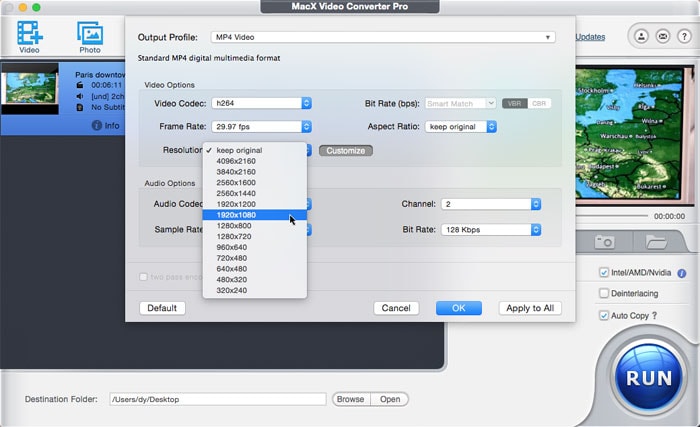
Click the ![]() video parameter setting button, then you can adjust the raw parameters to the proper range to shrink video file size without visually quality loss.
video parameter setting button, then you can adjust the raw parameters to the proper range to shrink video file size without visually quality loss.
Usually lower the resolution by one or two notches, for example, compressing MP4 video from 4K UHD to 1080p, or 4K to 720p, you will get almost no quality loss of your video. Besides, you're suggested to choose 4:3 or 16:9 aspect ratios according to your device's aspect ratio and maintain the frame rate to ensure the fluency of your video. If the bit rate is variable (VBR), change bitrate within the range 2-5 Mbps for SD, 5-10 Mbps for 720p, 10-20 Mbps for 1080p, and 30-60 Mbps for 4K, while when it shows as constant bit rate (CBR), the video shrinking program will adjust it automatically. Meanwhile, 128kbps audio bit rate is enough for most videos.

Step 4: Trim video length.
Click the  button to enter the video editing window. Here you're able to cut video length. Just click Trim and tick on the Enable Trimming box, then you can trim your video through sliding the modules at the front and rear of the timeline, or typing in the accurate time in the boxes of Start Time and End Time. By the way, if your videos have black bar or the like, you can choose Crop & Expand to cut it out for smaller video size as well.

Step 5: Start shrinking video now!
Tap on the RUN button, the video shrinking is in the process. It will be done with fast speed, but matters much for your video duration, and hardware configuration. If you output a HEVC MP4 video, you'll get an output video almost downsized by 90% with above settings and experience a blazing fast speed with hardware acceleration enabled.


