You ought to have at least one of these mobile devices: smartphone, tablet, camera, DSLR or camcorder. No matter which one you have, the currently flagship devices all enable you to record video at 4K Ultra HD resolution. 4K is impressive, being 4 times more pixels than 1080p. Yet, where 4K falls down is that the output 4K video size is too large to upload or share online. To be specific, a 1-min 4K 60fps video recorded by an iPhone X reaches 400MB in HEVC codec; the same 4K video recorded by GoPro Hero 6 is 600MB in H264 codec; and DJI P4P even makes 1-min 4K 60fps video (H264) up to 750MB.
So you can imagine (don't need to calculate) how large the 4K file would be for a 30-min or 60-min length. In such case, there is high likelihood that you would encounter failure when uploading large-sized 4K video to YouTube/Facebook or sharing via E-mail. To solve the 4K video uploading/sharing issues, the most effective solution is to compress and resize 4K UHD video to smaller size. Of course, you need a 4K video compressor to help you before you go into action. The most trustworthy 4K video compression software is the all-in-one MacX Video Converter Pro, which can virtually losslessly reduce 4K video size via 3 paths.
3 Ways to Compress 4K Video with Best Quality
The high-end 4K video compressor MacX Video Converter Pro is able to let you resize 4K Ultra HD video files (30fps/60fps) via parameter adjustments. In other words, you're allowed to use it to downscale 4K 2160p to 1080p (63% size off), change 4K video bit rate, frame rate and aspect ratio. Furthermore, this tool makes 4K video even smaller by converting 4K video codec from H264/AVC to HEVC (H265) with at least 50% size off. Also support compressing any video to HEVC, H264, MPEG-4, VP8, WMV, DivX, XviD, MP4, MOV, MKV, FLV, AVI, 3GP, etc. 180+ output formats.
The third way to shrink 4K file size is the "Edit" feature, which can further compress 4K video by trimming 4k video to shorten video length and cropping 4K to remove black borders from video. Thus, you can get the output 4K video file with much smaller size while keeping 98% quality thanks to High Quality Engine.
How to Resize 4K Ultra HD Video with Visually No Quality Loss?
Free download 4K video compressor software on computer:
Free download Mac version (macOS 10.5 or above)
Free download Windows version (Windows 10/8.1/7/XP)
Step 1: Compress 4K via Codec Conversion
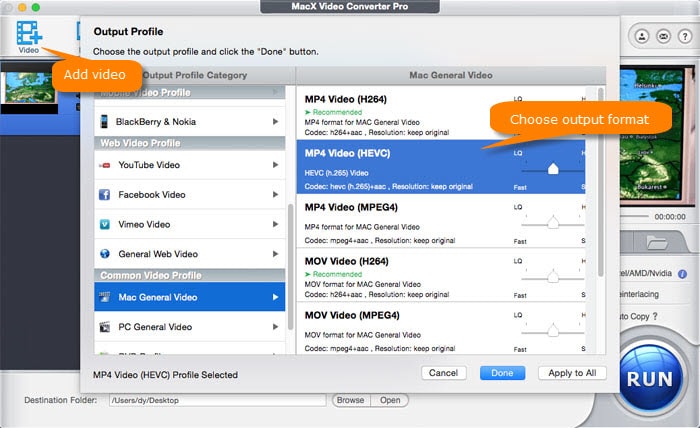
Launch this top video compressor and click the button with a + icon to import 4K video. Or simply drag and drop the 4K video file into the software.
Choose "MP4 Video (HEVC)" from "Mac General Video" profile as output video codec if the video playback device supports HEVC codec or the websites you wanna upload 4K video to is compatible with HEVC, as well. Alternatively, select "MP4 Video (H264)" from "General Profile" as output format if video compatibility matters more to you. BTW: there is a specific web video profile with the best video format and settings for uploading 4K to YouTube, Facebook, Vimeo, etc.

Note 1: On the lower right corner of the home screen, you can find that the Intel/AMD/Nvidia would be automatically selected if your computer supports one or two of these GPU hardware acceleration techs. The HW acceleration techs are used to improve your 4K video compression speed up to 5-8X faster than the normal 4K video processing on software decoding/encoding. Check the hardware configuration requirements of GPU hardware acceleration if you have the slightest idea about your computer configurations.
Note 2: In the same zone, there are "Use High Quality Engine" and "Deinterlacing" options, which are designed to maintain the output quality as high as possible, with 98% quality kept for general video processing and 100% quality reserved for "Auto Copy" mode (e.g., convert H264 video from MKV to MP4 format).
Step 2: Adjust 4K Video Parameter Settings
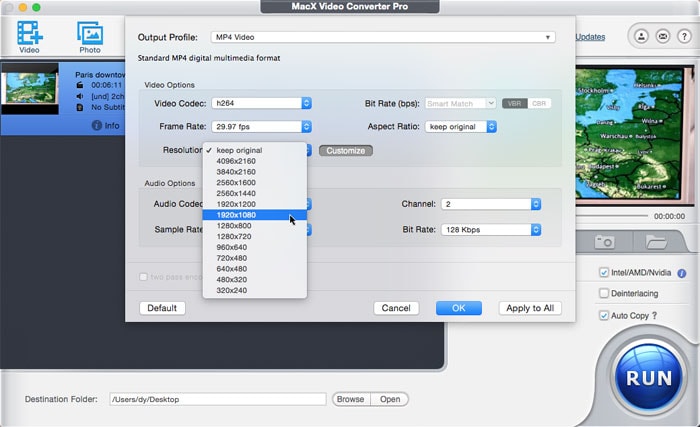
Tap the video parameter setting button with a gear icon ![]() to resize 4K to 1080p, change 4K bit rate, adjust 4K frame rate from 60FPS to 30FPS, resize 4K aspect ratio from 16:9 to 9:16/4:3/1:1, etc. Considering some of you are new to the parameter settings and have no idea how to adjust them to meet the requirements of social websites, here we list out the specific parameters for your reference.
to resize 4K to 1080p, change 4K bit rate, adjust 4K frame rate from 60FPS to 30FPS, resize 4K aspect ratio from 16:9 to 9:16/4:3/1:1, etc. Considering some of you are new to the parameter settings and have no idea how to adjust them to meet the requirements of social websites, here we list out the specific parameters for your reference.
| Social Media | File Size | Duration | Resolution | Aspect Ratio | Frame Rate |
|---|---|---|---|---|---|
| YouTube | ≤ 128 Gb ≤ 20Gb (if the browser you use isn't updated) |
≤ 12 hours | Up to 8K | 16:9 | Up to 60FPS |
| ≤ 15 Mb | ≤60 seconds | Up to 1080p | Landscape (1.91:1), Square (1:1), Vertical (4:5) | Up to 30FPS | |
| ≤ 10 Gb | ≤ 4 hours | Up to 4K | 16:9 (full landscape) to 9:16 (full portrait) 2:3 Mobile in feed; 1:1 Desktop in feed; 9:16 Desktop player; 2:1 for 360º video. |
Up to 30FPS | |
| Dailymotion | ≤ 2 Gb | ≤ 1 hour per video ≤ 2 hours per day |
Up to 4K | 16:9 or 4:3 | Up to 60FPS |
| Vevo | ≤ 512 Mb | / | Up to 1080p | 16:9 or 4:3 | / |
| Vimeo | ≤ 500 Mb per week for Basic account ≤ 5 Gb per week for Plus account ≤ 20 Gb per week for Pro account |
/ | Up to 8K | 4:3 (standard video) 16:9 (SD/720p/1080p/2K/4K UHD) 17:9 (DCI 4K UHD/8K UHD) 2:1 for 4K 360º video |
Up to 60FPS |
If you don't plan to downscale 4K to 1080p, just choose "Keep Original" from the resolution option. Similarly, manually change 4K frame rate from 240FPS to 60FPS or 60FPS to 30FPS, adjust bit rate and aspect ratio you need according to the above table. If you don't find the aspect ratio from the profile like 1:1 or 2:1, don't feel disappointed. Cuz you can go to "Edit" zone to freely adjust video image aspect ratio to 1:1, 2:1 and more aspect ratio.

Step 3: Edit 4K Video
On the main interface, tap the scissor-shaped icon  to activate the video editing feature of this 4K video converter. And to make 4K video file size smaller, the helpful editing features are mainly "Trim" and "Crop".
• Click Trim and tick "Enable Trimming" box. Afterwards, you're able to freely set up the Start Time and End Time to remove the unnecessary clips from your video to shorten your video length as well as resize 4K file size.
• Click Crop & Expand and enable Crop box. Then the marquee will pop up for you to freely adjust the video image size. Just choose your desired video height and width and then tap "Apply to All" button to save your changes.

Step 4: Start Compressing 4K Video
After the above steps are finished, simply click "RUN" button and this 4K video compressor will begin to compress and reduce 4K video size. The 4K video compression time mainly depends on the 4K video length, 4K video codec, your computer hardware configurations and the running status of your computer.
Resize 4K Video with High Quality and 30% Compression Ratio
When you do 4K video compression, output video quality, video compression ratio and compression speed are most concerned. MacX Video Converter Pro meets all your needs: No.1 fast hardware accelerated speed to compress and reduce 4K UHD video size with 98% quality kept (High Quality Engine). Take full use of MacX' video codec conversion, parameter adjustment and video editing features and you can downsize 4K video with 70% size off (30% compression ratio).


