If you’ve ever searched how to copy a DVD on Mac, you’ve probably seen conflicting advice. Some guides only cover unprotected discs, while others require extra tools or complex steps. In 2025, whether you’re using a MacBook Pro/Air, iMac, or Mac Mini, you can copy both homemade and commercial DVDs quickly and safely.
In this guide, we’ll break down 6 proven solutions – from free built-in options like Disk Utility and Finder, to powerful DVD copy software such as MacX DVD Ripper Pro, HandBrake, and MakeMKV. You’ll learn how to:
- Save DVDs directly to your Mac in ISO, MP4, or MKV formats.
- Copy protected DVDs without playback errors.
- Transfer copied DVDs from Mac to iPhone/iPad for on-the-go viewing.
Whether your goal is to back up family memories or digitize your movie collection, this step-by-step tutorial has you covered.
Key Takeaways of Copy Home & Commercial DVDs to Mac
- For unprotected DVDs: Use Disk Utility, Finder, or Burn for direct copying to Mac or another DVD.
- For protected DVDs: Employ a Mac DVD copy tool like MacX DVD Ripper Pro, Handbrake, or MakeMKV.
- For best quality backups: Copy to ISO, VOB, or MKV using MacX DVD Ripper Pro or MakeMKV.
- For device-friendly playback: Convert to MP4 H.264.

Part 1. How to Copy Protected DVDs to Mac
Use MacX DVD Ripper Pro - Best DVD Copy Software on macOS
MacX DVD Ripper Pro is the go-to DVD copy solution tailored for Mac users — from casual movie collectors to video archivists. Built specifically for macOS, it delivers unmatched performance across the latest Sequoia and older macOS versions. Effortlessly copy any DVD — even those with the most stubborn protections like CSS, RCE, Sony ARccOS, and Disney X-project — without relying on extra libraries like libdvdcss.
With industry-leading decryption and hardware acceleration (Intel, AMD, Nvidia, Apple M1/2/3/4), the DVD copy software is able to copy a full-length DVD to your Mac in just 5 minutes, while preserving up to 1:1 original quality. Below are the highlight features:
- 1:1 copy DVD to Mac: Save DVDs as ISO/MPEG-2/MKV with full original audio (PCM, AC3, DTS) for long-term storage.
- High-quality digital copy: Rip DVD to MP4, MOV, HEVC with up to 98% quality— perfect for iPhone, iPad, Apple TV.
- Copy protected DVDs to Mac: Bypass CSS, region codes, UOPs, Sony ARccOS, Disney X-project, and fake playlists — no libdvdcss required.
- Ultra-fast copy speed: Powered by Intel, AMD, Nvidia, and Apple Silicon acceleration — copy a full DVD to Mac in just 5 minutes. Ideal option to save a massive DVD collection to Mac.
Try MacX DVD Ripper Pro Today to Bypass DVD Protections and Copy Any Disc on Mac!
[Tutorial] How to Copy a DVD on Mac with MacX DVD Ripper Pro
Step 1: Free download and install MacX DVD Ripper Pro on your Mac. The latest macOS Sequoia are all supported.
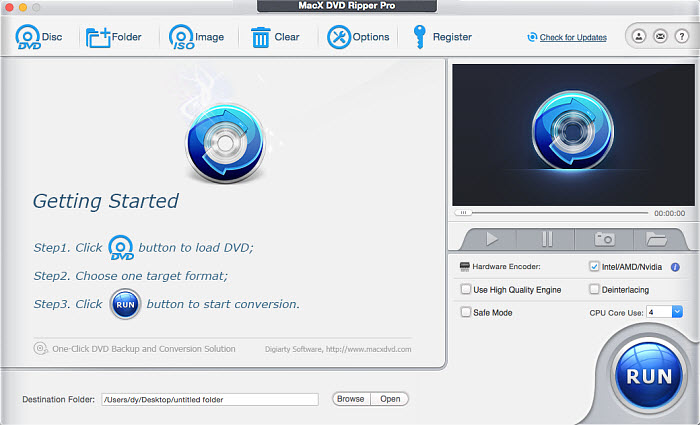
Step 2: Import the DVD you want to copy into the optical drive. Then, launch MacX DVD Ripper Pro and click "DVD Disc" to load the disc. Then, this software will scan and analyze your DVD. It will bypass the DVD copy protections on its own and detect the correct main movie title for you.
⚠️Warning: Apple has intentionally removed support for external CD-ROM drives on the new M3 chip Macs[1]. This means that you cannot directly connect and use an external CD-ROM drive with an M3 iMac. You may need to explore alternative solutions or consider an older Mac or a Windows computer if CD-ROM compatibility is essential.
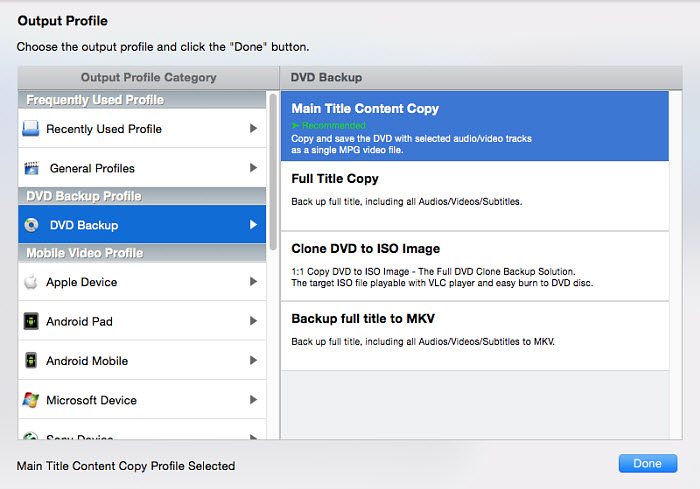
Step 3: Within the auto popup Output Profile window, specify which format you want to convert your DVD to.
For a complete DVD backup on your Mac, as an example: Select DVD Backup mode > Backup full title to MKV > Done. A 1:1 DVD copy will be downloaded on your Mac or external drive, preserving all original DVD content, including video, audio, menus, subtitles, and bonuses without re-encoding.
Tip 1. Creating DVD copies as ISO images or MKV files preserves 100% original video quality; however, these large files (5-8GB per commercial DVD) require ample storage space on your Mac. Note that ISO copies are not compatible with direct playback on TVs or mobile devices.
Tip 2. If you want to copy DVD to DVD, you can clone DVD to ISO with MacX DVD Ripper Pro first and then burn the ISO file to DVD using Disk Utility or Burn for Mac software.
To copy DVD on Mac for easier playback, select Mac General Video mode > opt for MP4 (H264) or (HEVC) if you intend to download DVD on Mac in MP4 or others for QuickTime, iMovie, FCPX, mobiles, etc. The High Quality Engine will use entropy encoding, inter-frame compression, and intra-frame compression to reduce the redundancy in data representation to reduce the size but also maintain the maximum quality (98%) via higher efficiency video coding.

Here are some tips for you to download DVD to Mac:
- For general use: MP4 (Best mix of quality, size, and compatibility).
- For high-quality backups: MKV (Best for storing full DVD features).
- For DVD archiving: ISO (Perfect for 1:1 backups).
- For Apple users: MOV (Optimized for macOS and iOS).
- For space-saving: Ripping to MP4 H.264 strikes a good balance between size (around 1-1.2GB) and quality.
- For DVD re-burning: MPEG-2 (Preserve the original DVD structure).
Step 4: Click the "Browse" button and select a destination folder to save the digital copy of the DVD movie on Mac.
Step 5. Click "RUN" to start converting and copying your DVD to Mac.
Pro Tips: Upscale and enhance the digital copies to 1080p or higher quality.
Since DVDs typically max out at 480p resolution, they often appear blurry, pixelated, and lacking in detail on today’s high-resolution screens. Whether it's an old home video or a favorite movie, standard DVD quality no longer meets modern viewing expectations. So it's highly recommended to enhance your digital DVD copies to crisp 1080p or even 4K for better clarity. Here are the detailed steps to upscale your DVD movie and improve the overall sharpness.
Before we get started, let's first download Macxvideo AI, an AI-focused video/image enhancer.
Then follow the steps below to enhance the DVD movie quality.
- Click "Video AI" button to kick off the video enhancement window.
- Tap "Add Video" icon at the bottom of the window to Load the digital copies to Macxvideo AI.
- Tick "Super Resolution" option and choose your preferred AI model like "Gen Detail" or "Real Smooth".
- Choose "Scale" or "Resolution" presets as per your needs. We recommended you to upscale DVD movie to 1080p for the best performance.
- Click "Browse" button to choose a file folder and hit the "RUN" button to begin enhancing video quality.

#2. Copy CSS-Protected DVD to Mac with Handbrake & Libdvdcss
Handbrake is another free option to save the DVD copy on Mac in MP4 or MKV format. Handbrake can't handle DVD protections on its own. However, most DVDs that you buy from a store are copy protected with CSS or region code. Luckily, there is third-party software to help. Download libdvdcss for Handbrake, and then you can copy a protected DVD onto your Mac.
Step 1: Free download the DVD copying software on your iMac 5K, MacBook, MacBook Air/Pro, etc. The latest version works on 64-bit Macintosh running OS X 10.6 or later. If you need to rip a copy-protected DVD, you need to download and install libdvdcss on your Mac.
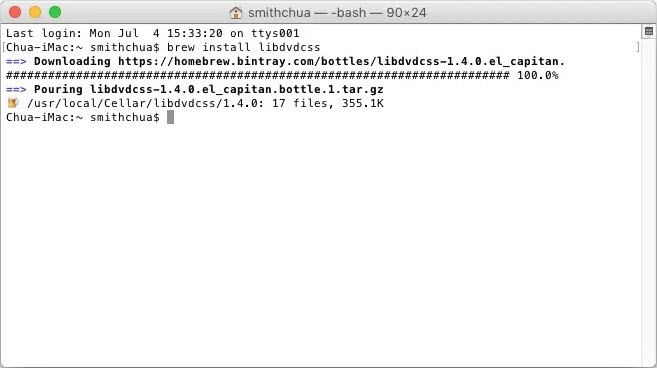
Start Terminal and enter "brew install libdvdcss" to get libdvdcss for Handbrake. Here is a more detailed guide on how to download libdvdcss for Handbrake.
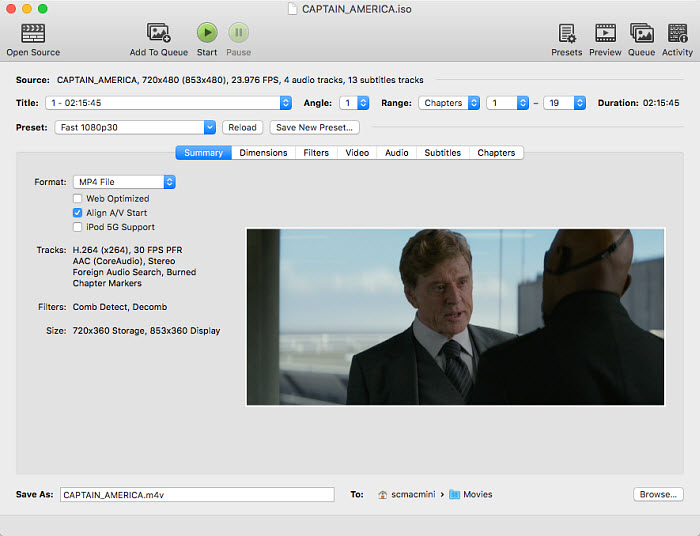
Step 2: Now insert the disc to DVD drive and launch HandBrake. You should see your DVD drive in the software. Handbrake may take several seconds to scan the DVD. Once finished, open the Preset drop-down menu and select a quality preset. Normally, to copy a DVD, you can use the 480p or 576p preset.
Step 3: If you need more settings, you can click on the Summary, Filters, and Video tabs to customize the DVD ripping. In most cases, you simply need to choose whether you want to copy the DVD to Mac in MP4, MKV, or WebM. (MP4 H.264 is the format for almost all iPhone, iPad, Mac, Apple TV, and other devices)
Step 4: Next, select an output folder on the Mac to save the DVD video copy. Then click Start Encode at the top of the window to copy DVD content to your Macbook or iMac.

Even with libdvdcss installed, HandBrake can only handle basic CSS and region code protections. It won't work with more sophisticated encryption found on many commercial DVDs — like Sony ARccOS, Disney X-project, or fake playlists. For those, you’ll need a more capable tool like MacX DVD Ripper Pro to ensure a successful DVD copy on Mac.
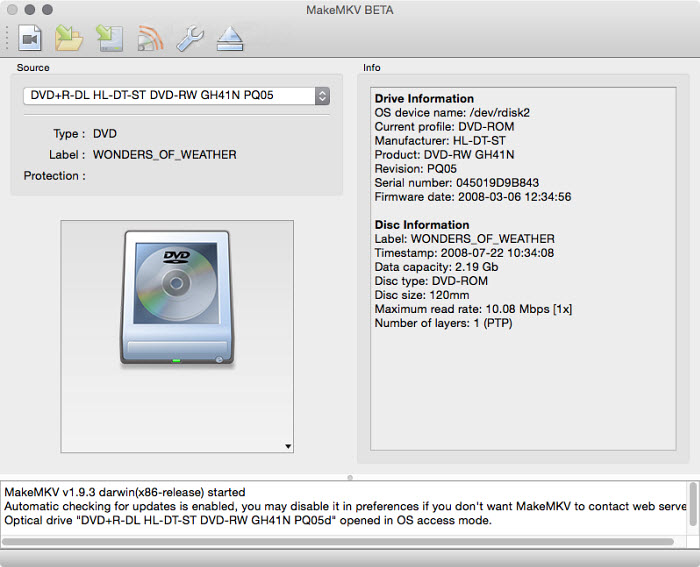
#3. Copy Protected DVD and Blu-ray Discs to Mac with MakeMKV
If you have some DVD and Blu-ray discs that you'd like to copy to your Mac, the best DVD copying software for Mac is MakeMKV. MakeMKV is able to make copies of DVDs and Blu-ray discs on Mac in MKV with high quality. More importantly, it's able to bypass the protections on the discs without using a third-party tool. It's free for DVD discs, and for Blu-Ray discs, you'll need to activate it after 30 days (or re-download it to restart the 30-day free trial).
Step 1: Download MakeMKV on your Mac and insert the DVD or Blu-ray disc into the disc drive of your Mac. Open MakeMKV and it should detect it and automatically show it.
Step 2: Next, click on the large DVD drive icon to scan the disc. It may take several minutes to analyze the DVD data, detect and remove the copy protection, find the movie titles, etc.
Step 3: Once finished, you will see all the chapters of the DVD or Blu-ray disc. Select the movie you'd like to copy (normally the largest file) and choose the audio/subtitle track you'd like to download. Otherwise, it will copy all the DVD data to your Macintosh.
Step 4: Select an output folder on the Mac to save the copied MKV file. Then click on the MakeMKV button and wait for it to finish.
Well, this is how to skirt copyright protections from DVDs and save a digital copy of DVD on MacBook Pro, MacBook Air, iMac, etc.
Part 2. How to Copy Unprotected DVDs on Mac
While the above tools offers robust and comprehensive solutions for copying your protected DVDs on Mac, the digital landscape provides a variety of tools catering to different needs and preferences. Below are methods for duplicating DVDs on Mac for free. The methods work with unprotected DVDs only. If you need to duplicate a protected DVD to Mac or a blank DVD, you will need a dedicated ripper to download the DVD to your Mac.
#4. Directly Download DVD to Mac by Simple Copy & Paste
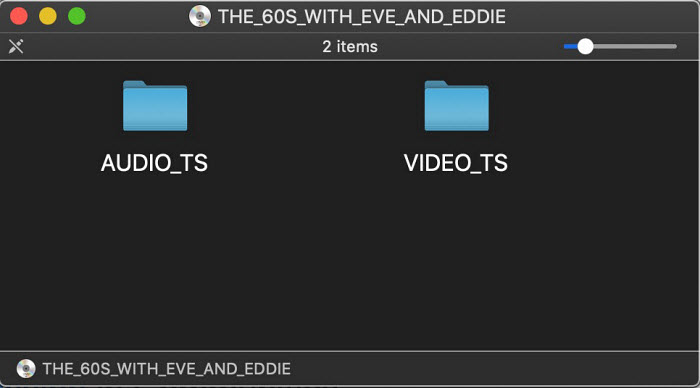
After you insert the DVD into your Mac, you may see the icon of the DVD disc on your desktop. If you don't see the DVD icon on the Desktop, click on Finder > select Preference > General. Under Show these items on the Desktop, make sure the CDs DVDs is seleted. Then double-click on the DVD icon. Inside the DVD, you should see a Video_TS folder and an Audio_TS folder. Drag and copy the DVD Folder to your Mac. Inside the Video_TS folder, the VOB files will be the DVD videos you need. The method, however, works with unprotected DVDs only.
However, copying DVDs to Mac may not always work using this method. This method is not suitable for copying copy-protected DVDs and may not maintain the original DVD structure. Then you will need to use Mac's Disk Utility to make copies of unprotected DVDs on your Macintosh.
#5. Download a DVD to Mac using Disk Utility
For Mac users, the built-in Disk Utility is a free and handy tool to create a digital image of CDs/DVDs. However, note that Disk Utility will NOT copy all DVDs, Most commercial DVDs with copy-protection mechanisms are not applicable and the output will be a virtual image file (ISO/CDR) rather than a playable video.
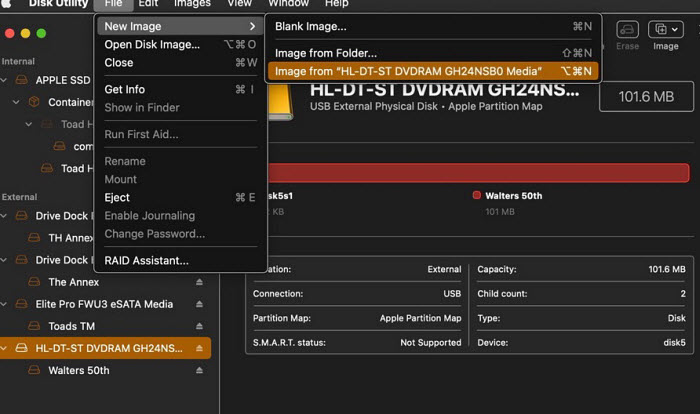
Step 1. Insert the DVD into your Mac’s optical drive. Open Applications > Utilities > Disk Utility. You should see the DVD disc and the drive listed.
Step 2. Select the DVD in the left-hand pane, then go to File > New Image > Image from [DVD name]. Name the file, set Image Format: DVD/CD Master, and choose Encryption: None. Click Save. Disk Utility will create a DVD image file on your Mac.
💡 Tip: Make sure you have at least 4–8 GB of free storage depending on your DVD size. If you only need a digital copy on Mac, you can stop here.
Copy DVD to DVD on Mac (OS X 10.10 and Earlier)
- Select the image file in Disk Utility.
- Click Burn at the top.
- Insert a blank DVD (single-layer or dual-layer depending on size).
- Burn at a slow speed (2x–4x) for the best quality.
Copy DVD to DVD on Mac (El Capitan 10.11 and Later)
⚠️Since OS X 10.11 El Capitan, Apple removed the direct DVD-to-DVD copy option in Disk Utility. Instead, you can use Finder:
- In Finder, go to File > New Burn Folder, drag the DVD image or files into it, then click the Burn button.
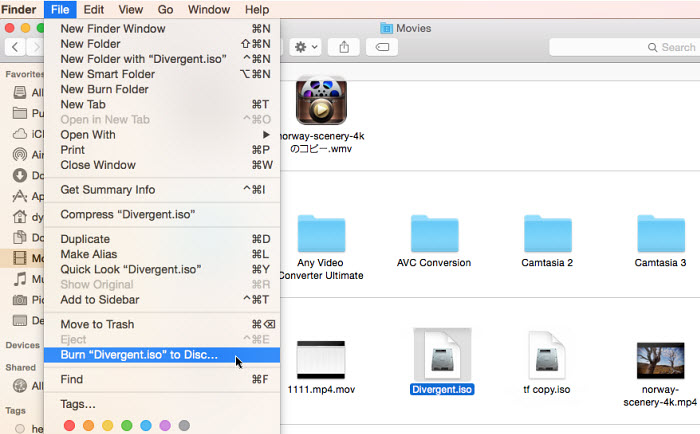
- Or, select the copied DVD image in Finder, then choose File > Burn [filename] to Disc.
For Mac users on newer systems (including Ventura, Sequoia, etc.), Finder or third-party tools like Burn for Mac are required to duplicate DVDs.
#6. Copy DVD with Burn for Mac
The free app Burn for Mac works on macOS 10.9 or higher (including the latest Sequoia 15) to copy a DVD video (MPG format) to a disc on Mac. It's easy to use with a lot of advanced settings like file permissions, dates, etc. to personalize your DVD. Before you transfer a DVD to DVD using the Burn app, you need to copy the DVD on Mac to an MPG file.
Step 1. Download Burn for Mac and run it. Then click the Video button at the top menu bar of the interface. Now insert a blank disc into the drive.
Step 2. Drag the copied DVD MPG video into the window for later burning.

Step 3. Give it a name and click the Burn button. Then a window will pop up asking you to set the burning preferences like the burning speed (the slowest speed available (2x-4x) will assure the best burn quality). Once set, click Burn and wait. It will make a DVD copy for you.
Bonus Tips: Copy DVD from Mac to iPhone, iPad
After you make a digital copy of a protected DVD in MP4, MOV, etc. on Mac, you may want to download the DVD movie from your Mac to iPhone or iPad to watch on the go. Below are the steps to transfer the DVD copied files from Mac to iPhone and iPad.
Note: On Windows and macOS before Catalina, you can use iTunes to import the DVD movie from Mac to iDevices. But on macOS Ventura and newer systems, you need to sync the data via Finder.
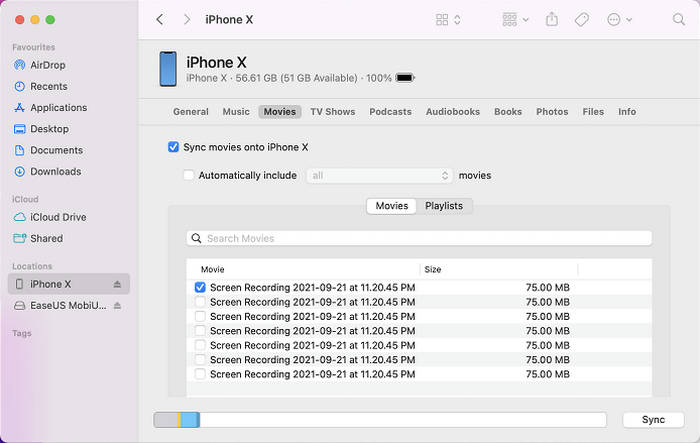
- Connect your device to your Mac via a USB or USB-C cable. Then click on the Finder app on the Mac Dock.
- Select your device on the left side of the screen under Devices.
- Click on the Movies tab and then enable the box Sync Movies onto your device.
- Under Sync, click the Automatically include box. Use the pull-down menu to select the DVD movie copies from your Mac.
- Click Apply and transfer the DVD copies from Mac to your iPhone iPad.
FAQ about DVD Duplication on Mac
1. What is the best DVD copy software for Mac?
The best DVD copy software for Mac depends on your needs.
- For unprotected DVDs, the built-in Disk Utility or Burn for Mac works well.
- For protected DVDs, tools like MacX DVD Ripper Pro (fastest & most reliable), HandBrake + libdvdcss (free, basic protections only), and MakeMKV (great for high-quality MKV backups) are the top choices.
If you want the safest option for any disc, MacX DVD Ripper Pro is the most complete solution.
2. How to copy a DVD on Mac without a disc drive?
Most modern MacBook models don’t come with a built-in optical drive. To copy a DVD to Mac:
- Get an external Mac DVD drive (USB or USB-C). Without an external drive, you cannot directly copy DVDs on a Mac. The drive is essential.
- Connect it to your MacBook, iMac, or Mac Mini.
- Use software like Disk Utility, HandBrake, MakeMKV, or MacX DVD Ripper Pro to copy DVD to Mac.
3. What programs can I use to copy DVDs on Mac?
Besides the above, there is some other paid and free DVD copying software that may work to make a DVD copy on Mac.
- Handbrake (free) - Copies DVDs to Mac in MP4, MKV, and WebM. Fast and free, but only works with unprotected DVDs unless you install the libdvdcss library.
- MakeMKV (free) - Great for copy-protected DVDs. Saves in MKV with high quality but large file size (around 3–7GB per movie).
- DVD Cloner ($59.99) - Premium tool for 1:1 DVD copies. Can copy directly to blank DVDs or save as ISO/DVD folders, with support for protections and formats like MKV H.264/H.265.
4. Can I make a copy of a DVD I own?
Yes, you can copy DVDs you own under the concept of Fair Use, such as backing up family videos or creating a personal digital library. However:
- Homemade DVDs can be copied freely.
- Commercial DVDs usually have copy protections. You’ll need DVD copy software (e.g., MacX DVD Ripper Pro, MakeMKV) to bypass them.
⚠️ Always check your local copyright laws, since distributing or sharing copied DVDs may be illegal.
5. What is the best format to copy a DVD on Mac?
If you want to make an exact copy of a DVD on Mac with original quality and data, ISO image is the best choice. But make sure you have a hard drive with large storage. For a more playable DVD copy, also consider copying DVDs to MKV. If you're copying the DVD on Mac for later burning, both ISO Image and MPG will work. To download DVDs on Mac for easier playback, H.264 is the best way to go.
External Sources:
- What is DVD copy protection From Wikipedia, the free encyclopedia
- How to copy your DVD with Mac OS X, written by Nicole Levine, MFA, last updated on June 14, 2024
Note: The MacXDVD software calls for copying or ripping DVD under the concept of Fair Use and does not encourage any illegal reproduction or distribution of copyrighted content. Please abide by the local DVD copyright law before doing it.
Have any problem on how to make a copy of a DVD on a Macintosh, just email us >>


Bella has been working with DVD digitization for over 12 years. She writes articles about everything related to DVD, from disc drive, DVD copyright protection, physical structure, burning and backup tips. The unceasing passion of DVD movies helps her build a rich DVD library and ensure a practical solution to address almost all possible DVD issues. Bella is also a crazy fan for Apple products.