As a popular social network site, Facebook is a great platform to keep in contact with family and friends, and watch videos. It even upload fantastic clips for sharing, supporting a wide range of file formats, say MP4, QuickTime MOV, FLV, AVI, MKV, 3GP, MTS, VOB, WMV, and more. However, when it comes to a DVD, Facebook doesn't make any response at all. So anyone who is eager to upload DVD to Facebook may pull a long face snoot as below.
"I have a video on DVD of me and my friend from Madame Tussauds and I want to share the DVD video clips to Facebook but how can I do that? Any help would be great!" - Laura

Here are mainly 3 reasons you need to convert DVD to Facebook beforehand:
- The physical DVD format is MPEG-2, which is excluded from Facebook supported video format list.
- The size of a general DVD file ranges from 4.7GB to 9.4GB, which greatly exceeds the Facebook video upload limit, up to 1 gigabyte in size. So you need to resize and shrink your DVD video into less than 1 GB before uploading DVD to Facebook.
- The max length of the video you can upload to Facebook is 45 minutes. Make sure to convert you DVD and cut it down within the length before uploading.
Recommended Software to Convert and Upload DVD to Facebook
As is mentioned above, Facebook imposes many restriction on DVD video uploading. So it's impossible to directly upload DVD disc to Facebook for sharing with the world. In this case, your burned DVD need to be converted to Facebook supported video format, preferrably MP4 or MOV, first for the sake of smooth uploading to Facebook.
Fortunately, MacX DVD Ripper Pro is a great assistant in terms of putting DVD on Facebook since it allows you to rip DVD to Facebook friendly video formats, to name a few MOV, MP4, AVI, FLV, MKV and more. Better still, this tool is built in a video editor and compressor that let you easily cut, crop, and shrink file size of DVD movie to a smaller and shorter one to meet Facebook video size & length requirements.
How to Convert DVD to Facebook Supported Video Format/Size/Length for Errorless Uploading
Step 1: Load DVD Movies or DVD Folder.
Free download the DVD to Facebook converter and run it on Windows (Windows 10 incl.), import DVD by means of clicking "DVD Disc" button. Alternatively, you can import this disc by hitting "DVD Path". BTW, MacXDVD Software provides two versions to finish DVD video conversion. For windows users, you can download Mac Version (macOS Big Sur incl.).
Step 2: Choose Output Format.
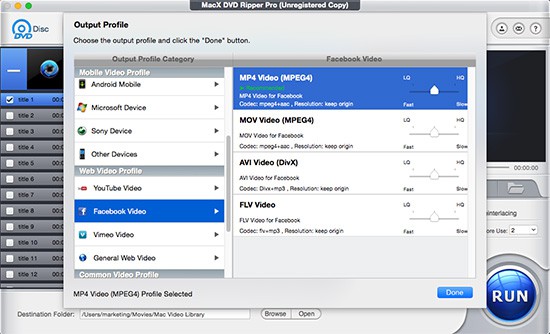
Once finishing DVD importation, this DVD ripper for Mac automatically pops up more than 400+ optimized output profiles for Facebook, YouTube, Web Video, iMovie, iDVD, Final Cut Pro, iPhone, iPad, iPod, Samsung, etc. Here, you can just go to Web Video Profile > click "Facebook Video" and select the preferred video format, say MP4 as your output format from the list (MP4 keeps a good balance between file size and video quality) so that you can upload DVD to Facebook without the annoying Facebook video uploading errors.

[Optional]: In view of the fact that you are willing to upload DVD to Facebook, there is a big prosibility that the converted DVD surpassed the Facebook video uploading allowed size and length. So you might as well reduce your converted DVD size by cutting it in segments, compressing the DVD to even lower resolution, removing the black border, etc.
Below are Facebook Video Setting Tips:
- Choose the video format MP4.
- Adjust the parameter settings: Since the DVD video resolution and frame rate is generally 480p/576p, and 24fps, so we highly recommend you to keep the frame rate and resolution unchanged. Generally, MacX's readymade profiles is the best setting suitable for uploading DVD to Facebook. So you don't have to even know Facebook upload settings but follow the profile setting as per your needs.
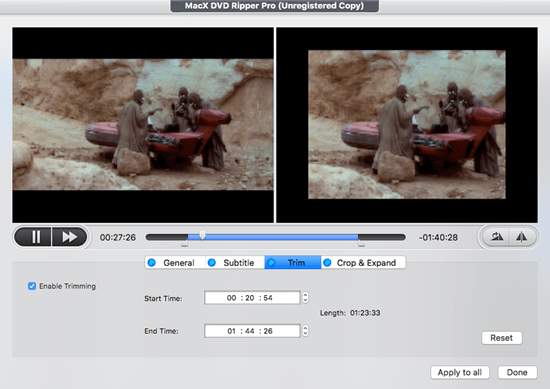
- Cut the video within 45min: On the main interface, there is a scissor-shaped Edit button next to the title, click on it to enable the video editing feature. Here you can set the start time and end time and choose the video segment you want to upload to Facebook. It's suggested to cut the DVD video within 45min.
- Crop the video according to facebook ratio recommendations: For video carousel, square 1:1 is preferred; for facebook stories, 9:16 to 1.91:1 is recommended. Just go to Crop & Expand option to adjust the aspect ratio as per your needs. See the full guide of how to resize video for YouTube Facebook uploading >>

Step 3: Select Output Folder.
Specify output folder on your Mac to save the output files. Click the "Browse" button to choose the path where you want to save the output files in.
Step 4: Start DVD Content Ripping.
After finishing the above steps, start ripping DVD movie video to Facebook friendly format for uploading DVD to Facebook by clicking "RUN" button.By countesy of the level-3 hardware acceleration, it will take only a few minutes to finish the DVD to Facebook conversion, as long as your computer is equipped with the latest CPU and GPU.
Note: MacX DVD Ripper Pro proves to be a strong software to rip any protected DVD, whether it is from Sony, Disney, Paramount or Lionsgate. But we strongly advise you to follow your local law and respect the ownership of the DVD itself.
Upload Converted DVD to Facebook Straightway
Finally, with all things done above, you are able to upload the new DVD movies to Facebook Now! Navigate to your Facebook home page or profile and click "Upload Photo/Video." Find the converted DVD movie files you saved and click "Post."


