It's the truth that your Sony or Canon camera's videos can not function well on your mobile device like Android, iPhone, iPad. Reasons are that: one, the HD camera's videos are usually formatted with high definition format like MKV, AVCHD, MTS, TS, M2TS, etc. Higher quality means bigger file size; two, the HD camera generally produces a video clip up to several GBs. Guess how much free space your mobile device are left for videos with GB in size, esp for your iPhones?
To make those HD or even UHD video playable on your handheld devices, you need to resize video first. The below part is coming just for this purpose, with 4 solutions for you to choose from.
Best Video Resizer to Reduce Video File Size (4K and 1080p)
To downsize HD and even 4K UHD videos, you're suggested to take the best-ever - MacX Video Converter Pro into consideration. It is a professional video compressor, HD video converter as well as video editer, allowing you to directly trim video length by freely setting the Start Time and End Time, crop video border by moving the marquee, lower video resolution, e.g. from 4k to 1080p, change video aspect ratio (4:3 to 16:9 or vice versa) for full screen playback, up or lower video Bit rate/frame rate for a better video compression result. It supports transcoding any video to MP4, MOV, AVI, MKV, FLV etc with 180+ video and 14+ audio formats supported.
Top 4 Ways to Resize Video for Smaller Size and Shorter Duration
[Option 1]: Trim Video to Shorter Length
Videos you shot with GoPro, DJi or other HD/4K camcorders can be hours long, which without any doubt eat up your device space or so. Cutting videos in segment to get the essence is the most intuitive and simplest way to resize video into a smaller one for faster uploading. Most of all, most online portals like YouTube or others set restrictions of the video length as well. So if necessary, cut the video length with MacX Video Converter Pro to make the video have a smaller size to upload online without any problem.
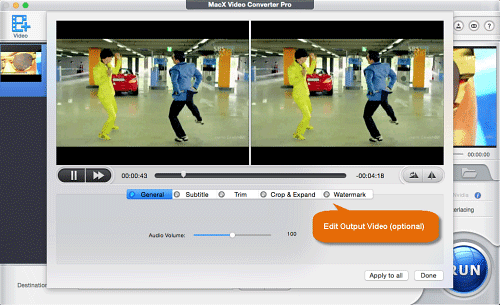
Take the same steps of load target video in the original format as option 2 did. And then click "Edit" icon to enter the edit interface > Cutting videos by clicking "Trim" > Checking the box of "Enable Trimming". > Then you can adjust the start and end time of the video.

[Option 2]: Crop the Frame/Display Size
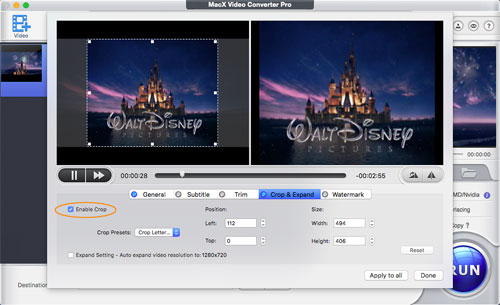
As a video size converter, MacX Video Converter Pro enables you to crop videos display and change the aspect ratio in such a way to resize the video and make the file to better suit the default player of YouTube or other online video services.
Take the same steps of option 3 to enter the edit interface and click "Crop & Expand" button. > Check the box of the "Enable Crop". Then the position and size you want to crop the video display are available to adjust. For example, black borders are undesirable enough to crop out for full screen playback. More or less, it's another way to adjust the aspect ratio. For example, YouTube supports the best video playback in a ratio of 16:9, make sure to crop the video in this ratio.

[Option 3]: Lower the Video Bit Rate and Resolution
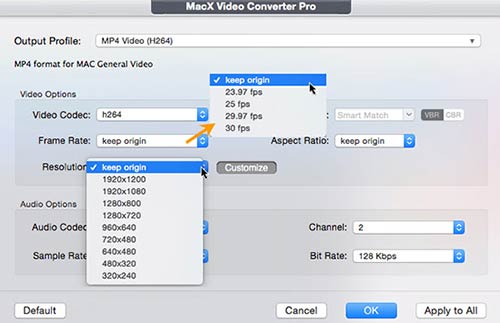
As we know, bit rate and resolution greatly influence the size of the video. The bigger the bit rate and resolution are, the bigger the video size is, and vice versa. So in order to compress video size, you can decrease the bit rate and resolution within the acceptable limits. Well, how to resize video by changing bit rate and resolution with the video resolution converter?
Step 1: Load target video in the original format. After loading the video, choose the original format as output one.
Step 2: Change the bit rate and resolution. Click the gear icon to select the bit rate and resolution you desire. You can freely adjust resolution to 720P or smaller to reduce the video size. And if the video format supports variable bit rate, you can also minish the bit rate for smaller video size.
Step 3: Specify the output folder. Click "Browse" button to save the resized video where you like on computer.
Step 4: Start reducing video size. Hit "RUN" button, and this best video compression software will be finshed in a quick time.

[Option 4]: Compress Video to Smaller Sized Video Format
Generally, video sharing sites only support several specific formats like MP4, FLV, WebM, 3GP, AVI, WMV etc. The sizes of the video formats are different, too. If you want to upload videos to Facebook, YouTube etc., formats greatly compressed like MP4, 3GP, FLV, WMV, ASF, MOV etc are recommended. Thus you can convert MKV to MP4, M2TS to FLV, MOV, 3GP etc. with free MP4 converter to reduce video. Let's check how to reduce video size by converting.
Step 1: Load target video. After Free downloading this 2-in-1 video resizer and converter, install and launch it. Click "Add File" button to load the video you want to resize.
Windows version video resizer is available as well to reduce video size on PCs.
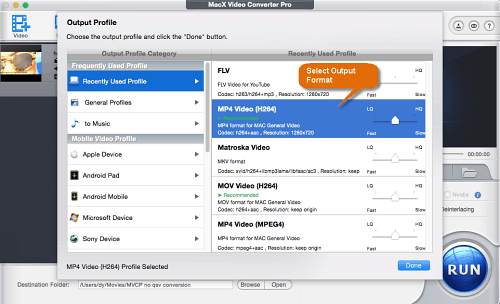
Step 2: Choose the output format. Here you can choose different video formats from the popup window. Of course, smaller size formats such as MP4, MOV etc are suggested.
Step 3: Specify the output folder. Specify output folder on your computer to save the output files. Click the "Browse" button to select a folder where you want to save the resized video.
Step 4: Start compressing video size. Click "RUN" button to start compressing video size process by converting.


