Posted by Farrah Penn -
Contact Author
How to Fix Audio and Video out of Sync After Importing to Adobe Premiere Pro
 If you are searching for an easy solution, click here: The solution most recommended by us [85%]
Audio and Video out of Sync in Adobe Premiere Pro? 2 Fixes.
When we browse the internet, we find that many Adobe Premiere Pro users are stuck with audio and video out of sync issue. The audio and video are in sync when playing on VLC, Windows Media Player or another media player, but become out of sync after importing the file into Adobe Premiere Pro for editing. The video runs faster than the audio, or the other way around. That's quite weird. They've tried various fixes, such as re-importing video and reinstalling Premiere, but nothing worked.

Actually, the main reason for audio out of sync after importing to Adobe Premiere Pro may be that the footage adopts variable frame rate (also known as VFR) which Premiere Pro cannot handle. We are suggested to enable Preserve Audio Sync which is available with the release of Premiere Pro CC 2018 12.0.1, when we import VFR video to Premiere Pro. However, this trick doesn't always work. What's more, it can result in choppier-looking video. Therefore, the best solution is to convert VFR to CFR (constant frame rate).
How to Fix Adobe Premiere Pro Audio and Video out of Sync - Change File Extension to .dif
The first fix you can try is to change your video's file extension to .dif. Adobe Premiere Pro will not read part of the variable frame rate video during import, thus causing audio out of sync issue. But by changing extension to .dif, this will make Premiere to read the file correctly. Below are the steps.
Step 1. Download and install Apple's QuickTime on computer.
Step 2. Select the problematic video, delete the original file extension for example .mov/.mp4, and then enter .dif. Once done, import the .dif file to Adobe Premiere Pro and see if audio and video sync issue is fixed or not.

When the file extension is hidden, you need to:
▶ On Windows 8/10: Double click on This PC in the desktop -> click View tab on the top bar -> check File name extensions box.
▶ On Windows 7: Right click on the Start button and choose Open Windows Explorer -> click Organize and choose Folder and search options -> click View tab under Folder Options and uncheck Hide extensions for known file types.
▶ On Mac: Click Finder in the menu bar and choose Preferences -> click Advanced tab and check the box of Show all filename extensions.
However, renaming to .dif isn't 100% working. Some users said that their Premiere didn't support .dif, and some said that Premiere crashed after importing .dif file. If this solution doesn't work for you, converting VFR to CFR, which is proved to be more feasible than changing file extension, should be the way to go.
How to Fix Adobe Premiere Pro Audio and Video out of Sync - Convert VFR Video to CFR Video
VFR displays the prominent advantage of reducing the file size of video recordings. However, to edit video in Adobe Premiere Pro without audio sync drift issue, we have to convert VFR video to CFR using a video transcoder, VideoProc for instance.
VideoProc - The Quick Solution to Convert VFR to CFR for Fixing Premiere Audio out of Sync
- Accept all VFR videos, such as the ones created with iPhone, Shadowplay, Xsplit, and OBS.
- Provide multiple constant frame rate values for choosing, ranging from 15 to 60.
- Offer lots of output formats, including MP4, AVI, WMV, MKV, MOV, and more.
- Make use of Intel/NVIDIA/AMD hardware acceleration and other techs to enhance converting speed.
- Also support video editing: cut, crop, merge, split, deshake, denoise, adjust brightness, etc.
 Download VideoProc on Windows
  to convert VFR to CFR
 Download VideoProc on Mac to convert VFR to CFR
After downloading the setup file of VideoProc, simply install it following the instructions. Once done, you can follow the steps below to convert variable frame rate video to constant frame rate. It is quite simple.
Step 1. Open VideoProc, click Video function button, and then import the VFR video which causes video and audio out of sync issue in Premiere Pro by clicking + Video button or by dragging-and-dropping. Batch import is also allowed.
Step 2. Click the Video tab at the bottom to choose a desired format. You can remain the original format or select a different one. Clicking Target Format will bring you more choices.
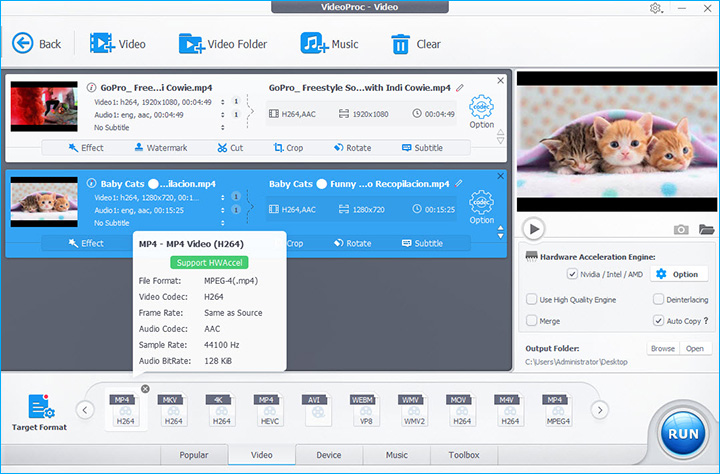
Step 3. Click Codec Option, find Frame Rate (FPS) option in the pop-up window, and choose the FPS value. If you select 30 FPS, you will get a 30-FPS CFR video.

Step 4. If you have nothing to tweak, simply hit RUN button at the bottom right corner to get VFR to CFR conversion started.
Once finished, import the newly-created CFR video into Adobe Premiere Pro and you should see the video and audio is in sync now.


