MacX DVD Ripper Pro
backup and rip your DVD collections to virtually any format for watching on Mac iPhone iPad and Android, 100% lossless quality.

backup and rip your DVD collections to virtually any format for watching on Mac iPhone iPad and Android, 100% lossless quality.

Step 1: Before you get started, go to the official site MacX DVD Ripper Pro or click the download button to get the program on Mac.
Supported macOS: Mac OS X 10.6 and above.

Step 2: Double-click the DMG file you download and open it. A finder window appears, drag the MacX DVD Ripper Pro icon to the Applications folder and it's done. Now, MacX DVD Ripper Pro is installed on your computer. You can drag MacX DVD Ripper Pro to the Dock for easy launching.

MacX DVD Ripper Pro offers users free trial, but the trial version has the following limits.
The trial version only allows users to convert 5 minutes of each DVD for evaluating purpose.
1. Free users have no access to free update to the latest full version of MacX DVD Ripper Pro.
2. Some advanced features are not available in trail version.
3. You can follow steps below to register and update to the full version to remove the limits.
Step 1: Click the Register icon at the bottom of the interface and the Register window will appear.
Step 2: Click the Buy Now button, finish your payment, and you'll receive the registration information.

Step 3: Enter your email address, license code, then click the Activate icon to complete the process and enjoy the full version of MacX DVD Ripper Pro.

MacX DVD Ripper Pro also works as a DVD copy tool, enabling users to rip, convert and backup home DVDs and commercial DVDs speedily. It is even able to handle 99-title DVDs, workout DVDs, Japanese DVDs, Disney movies on DVDs, and more. Follow the guide below to digitize and backup your DVD collections.

Step 1. Load DVD Movies or DVD Folder.
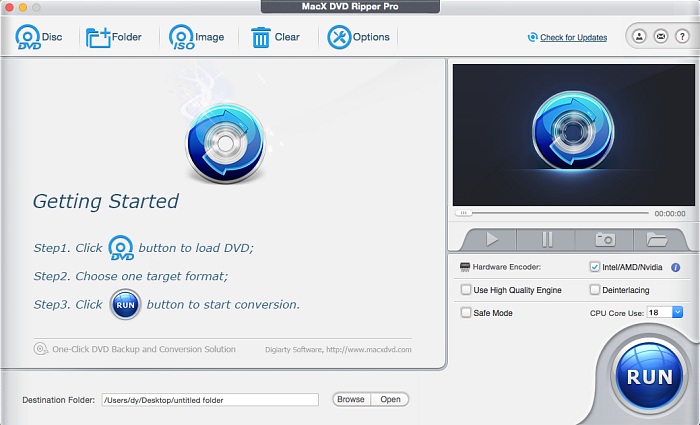
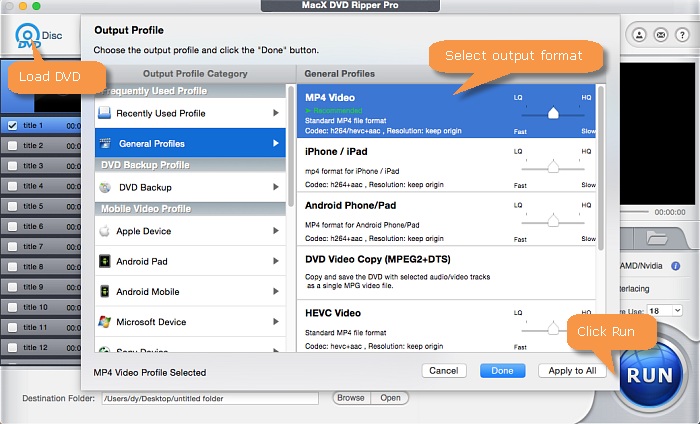
Run MacX DVD Ripper Pro, load DVD by clicking "DVD Disc", ISO image by clicking "ISO Image" or DVD folder by clicking "Folder". This all-conquering can rip whatever you feed, the standard DVDs like Hollywood DVD movies, or non-standard DVDs such as workout DVDs, Beachbody DVDs, yoga meditation DVDs, AV (Japanese) DVDs, adult DVDs, etc. Test it if you're buying this.

Step 2: Choose the output video/audio format.
Select the output video or audio format you desire from the drop-down window. You could choose the video formats and portable devices as you need, such as MP4, FLV, AVI, MPEG, MOV, iPhone, iPad, iPod, Samsung, HTC, WP8, PS4, etc.
Tips:
#1. To improve the output video quality, you can select "High Quality Engine". If your original video is interleaving video, select "Deinterlacing" and the Advanced De-interlace Accelerator can convert it to progressive scanning video with much clearer image.
# 2. Choose "Safe Mode" to smooth the conversion process. But the DVD ripping under Safe Mode takes a little more time than normal mode.
# 3. You can also take full use of the Intel Quick Sync Video hardware acceleration tech and the multiple CPU cores use, which will accelerate DVD ripping process up to 250-320 FPS, 2 times faster than other competitors, 5 minutes to finish DVD conversion mission.

Step 3: Set Destination Folder. Click the "Browse" button and navigate through the folders on your computer, and select the folder where you want the ripped DVD movie to be saved.
Step 4: Start Conversion. Now click the "RUN" button to start ripping DVD on Mac, you could view the conversion progress and are able to cancel the converting process at anytime.
Step 1: Insert your DVD disc and load your DVD by clicking on the DVD button and the Disc icon.
Step 2: Click the DVD Backup tab to initiate the DVD backup options.
Step 3: Select a backup type you prefer. four modes are available, including Main Title Content Copy, Full Title Copy, Clone DVD to ISO Image, and backup full title to MKV.
Step 4: Click the RUN button at the bottom to begin to make a copy of your DVD movies. It just costs you 5 minutes to copy a full DVD. There is no quality loss at all.

Most DVDs are encrypted with DVD Copy Protections and come with 99 titles. MacX DVD Ripper Pro supports ripping DVD movies of all types of copy protections put in place by DVD publishers. It removes CSS encryption, Sony ARccOS, RCE region protection, UOPs, CPRM, as well as Disney new DVD copy protections and helps to choose the correct title for you before DVD ripping.
You can also choose DVD title manually (Optional).
1. Play the DVD movies first with DVD player software. When it comes to main content of the movie, please check the DVD title and record the title number.
2. Find the title number you record and tick it.
3. Select your targeted video/device and destination folder. You are good to go!
Tips: This DVD ripper for Mac can detect the correct title, so that you can rip DVD from the main movie content in correct order without choosing the DVD title manually. Just follow the 4 steps mentioned above if you want to rip protected DVD to MP4, MOV, FLV, iPhone, iTunes, iPad, HTC, Samsung, etc.
Click the Video button at the main interface and import the video you wish to edit. The guide below will walk you through the editing process.
* Crop DVD Frame Size, Remove Black Bars
Select "Edit" tab of the DVD movie to be ripped, click "Enable Crop" button and adjust your video's aspect ratio to Full Screen, 16:9, 4:3, 1:1 to better fit your iPad screen. Or you can cut off unwanted area and remove black bars by dragging the resizable handle and frame. Once you finish your setting, press "Done" to confirm.

* Trim Video to Get Favorite Segment
Select "Edit" button, the submenu Trim window allows you to adjust the duration of the video segment by dragging the left or right bar under the video preview windows or modify the "Start Time" and "End time" with values directly.

* Choose Subtitle Track and Language, Add External Subtitle to the Movie
Select "Edit" tab of the video need to convert, click "Enable subtitle" button to add built-in subtitle tracks to the video. Or you can load an external subtitle file (.srt) to the movie. If you don't have a subtitle file yet, go to opensubtitles.org to search and download one for free.

Tips: There are quite a lot of users wishing to get the copy content with forced subtitles as below: "I am currently using the Mac X DVD Ripper Pro software version 4.5.2. I am trying to create a backup copy of the film "Jack Ryan: Shadow Recruit". I am not able to create a copy that shows the forced subtitles. Please let me know if you have any suggestions."
Subtitle is disabled by default. You are able to select Forced Subtitle here:

* Bonus Features to Adjust Parameter Setting, Merge Several Titles, Edit File Name, Extract Picture.
1. Button 1 allows to select several titles and click "Merge titles" to combine them into one.
2. Button 2 "SET TAG" lets you edit the file name as you want.
3. Button 3 enables you to adjust frame rate, resolution, bite rate, audio channel, etc according to your advanced need.
4. Button 4 permits you to take picture appearing in the movie and store as PNG.

Sometimes you might need to uninstall the MacX DVD Ripper Pro. Here we provide the exact steps to remove the software on Mac platform.
Step 1: Find the folder containing MacX DVD Ripper Pro.
Step 2: Drag the software to the Trash icon in the Dock. You'll need administrative rights if it's installed in your Applications folder.
Step 3: Remove MacX DVD Ripper Pro software from your Dock, simply drag it out of Dock with your mouse.
Home | About | Site Map | Privacy Policy | Terms and Conditions | License Agreement | Resource | News | Contact Us
Copyright © 2025 Digiarty Software, Inc (MacXDVD). All rights reserved
Apple, the Apple logo, Mac, iPhone, iPad, iPod and iTunes are trademarks of Apple Inc, registered in the U.S. and other countries.
Digiarty Software is not developed by or affiliated with Apple Inc.
